Camera Tips, Production Design and Storyboard: Refine your work!
Thanks again to George Brown College for providing these excellent resource materials. This may be an avalanche of information, but it is worth the read.
For those of you writing your script, the following resource is a free script software. I've not used it, but feel free to check it out. They have a weekly contest ($1000 prize) for best script.
- Celtx (http://celtx.com/) is free all-in-one pre-production software.
- Handy drop-down menu in script editor helps you automatically format your script!
- Try it out and see if it will help you with your Script assignment due next week.
Camera Direction Basics
Get VISUAL!!!! In your script, don't forget to describe the setting, characters and camera movements. The clearer you can paint the scene with words, the easier it will be to storyboard it.
Include:
- Shot Size Descriptions
- Abbreviations for scripts
- Shot Diagram
- Camera Angles
- Point of View
We will go into these in further details when we get into later phases of production design, but for know we’ll cover the basics so you can write these camera directions into your scripts.
- 2 key elements to understanding the visualization of a shot: shot size and camera angle.
Let’s look at shot size first:
- We know Long Shot, Medium Shot and Close-Up are the universal composition units.
- They’re overlapping portions of a single space and only make sense in relation to one another.
- They’re used together to create consistent spatial / temporal order.
- Can be used for spaces as large as a Solar System and as small as the head of a pin.
- Shots are scaled to the subject and related to one another proportionally.
 |
| Framing Heights |
Shot Sizes:
- Extreme Close-up – ECU
- Medium Close-up – MCU
- Close-up – CU
- Medium Shot – MS
- Wide Shot – WS
- Long Shot – LS
- Extreme Long Shot – ELS
- Background – BG
- Foreground – FG
- Over the Shoulder – OTS
- Point of View – POV
The Close-Up
- Exploited heavily in Television cinematography
- Brings us in closer contact with the action
- For dialogue, shoulder-and-head shot is the standard
- “The most natural cut is the cut on the look” – Jean-Luc Godard
- Think of all the expression that can be expressed through facial movements
- smirks, winks, glares and all the other vocabulary of the eyes.
- Can bring us into a more intimate relationship with the characters on screen
- Can also make us feel like we are intruding on privacy or sharing a moment
Convention is to position a character’s face off-centre, leaving extra space to the side of the screen the subject is looking and more space at the bottom than at the top of the frame.


Extreme use of frame width can also be used for unconventional framing to create a mood (also helps free up screen area if you need to overlay text)


Mood
Tension
Exaggerated Style

The Extreme Close Up
Eyes, mouth and ears are frequently given extreme close-ups- Usually to advance some specific part of the narrative.
- Ex. A shot of a woman walking home alone at night might be followed by an ECU of her ear as the sound of footsteps approaching is heard.
- Might also use an ECU of her eyes to show fear
The Medium Shot
Still widely used in Film and TV for dialogue scenes- Captures character’s gestures but still close enough to catch facial expressions well
- General range for group shots involving dialogue
- The 2-shot, 3-shot, 4-shot and 5-shot are typical groupings for this (will examine this more when we look at staging)
- With more than 5 characters in a scene, the camera is often brought out to a Full shot.
 |
| Standard Mid Shot with characters angled to camera |
 |
| http://www.annamorphic.co.uk/machinima/ms2.htm |
The Long Shot
Alternative to medium and close shot, fallen into disfavour in past few decades in film-making- Requires dialogue shots to be played in long takes (cutting pattern of closer shots unnecessary)... And well know what our attention spans are like
- But Full shots allow characters to use body language, action and combat interaction
- But think how boring fight scenes would be if they were ALL shot as long shots!
- Many opportunities for asymmetrical framing with Full shots

The Extreme Long Shot
AKA Wide Shot (WS)- Subject is small in the overall image
- Sometimes referred to as an Establishing Shot
- Perfect for emphasising the background and environment the character is against, especially as the first shot within a sequence
- Hard to see the subtle dramatic performances of the character - (so gestures may need to be played big if this wide framing is to be continued for a long length of time)

 perfect chase scene
establishing shot
shows location overview
The Background / Foreground
- Can reveal scene elements by changing the focal length of the camera to emphasize a particular object/character/thing in the foreground or background
- Can also used with our without characters in the shot
- Can also be transitioned between to move smoothly

 < Background shot
Foreground shot >
 The Over the Shoulder (OTS) >
One of the most common shots in film, television, and game cinematics.
- It frames a dialogue speaker with the shoulder and back of the head of the character being spoken to.
- Can mix close, medium and long shots in OTS
Point of View (POV)
Gets us in the perspective of a character in the scene
- Makes it more personal, but can be cheesy if over-uses / mistreated (camera nod)
- Close, medium and long shots can be mixed depending on character position in scene.

We have been talking about point of view from the First Person here ( in a script you will identify whose perspective we are seeing things from – i.e. BATMAN’S POV)
We can jump between points of view (use BACK TO SCENE when we exit a character’s POV)
Typical points of view:
- First Person
- See above
- Third Person Restricted:
- As seen by an observerMost common in Hollywood films and game cinematics
- Rarely used as the sole POV though
- Most of the time combined with omniscient
- Omniscient
- We have to know what the characters are thinking for this to work
- Requires some type of narration / voice-over / graphics
- Overt narration is usually thought to be “uncinematic”, rarely used
- Open for further development and new ideas on how to treat it.
Cinematic vs Print POV
In a novel, there’s no question whose POV we are reading from (most of the time)
In film and cinematics, POV can be less definite
General rule for shaping level of viewer identification:


High-Angle View 1
 A man drives up to a convenience store to find a phone.
 He goes to the door but then sees a phone booth beside the building.
 He walks to the booth and makes a call.
 He goes to the door but then sees a phone booth beside the building.
 He walks to the booth and makes a call
Production Design Includes:

Design Progression
Model Sheets
The Sliding Scale
The shorter your piece, the more you must rely on indicative (visual) deign for characterization. Longer films allow you to use behaviour to convey this
 Quick-Start Visual design techniques


Connect Style with Story

Overall style
Colour palette
< Monochromatic palette
Sets and Props, Vehicles
Lighting, rendering and post-production


Simulating Alternative Media can often be render-intensive, require a lot of post-production and will require you to plan for it in your production pipeline (time to learn new rendering techniques + test, time to spend on post-production after rendering etc...)
The payoff can be beautiful
Storyboarding
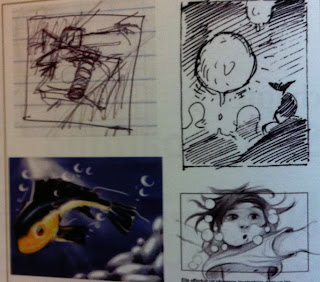
 Explore! Try things out! Have fun! Experiment! Then refine and edit
Just like in 2D animation, draw fast first, then good later.
Storyboard thumbnails plot action and story
beats >
Story Beats
Storyboarding – how much is necessary?
General to Specific
Ask yourself the following questions:
Tips
3 components of each panel
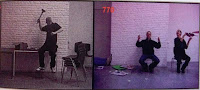
If you prefer not to draw you can use 3D dioramas and photograph them...or use live actors

 Arrows can indicate object / character movement


In a novel, there’s no question whose POV we are reading from (most of the time)
In film and cinematics, POV can be less definite
- Some shots can convey a narrative stance somewhere between 3rd person and fully subjective.
- Sight line of actor in CU can be most powerful cue
 |
| Where is the actress looking? What does that tell us about POV? |
General rule for shaping level of viewer identification:
- The closer the sight line of a character in CU is to the camera, the greater the level of viewer identification
- Graphic uses composition and staging
- Narrative uses editing (scenes begin when Private Eye enters office and ends when he leaves)
Camera Angles
By themselves, camera angles have no meaning
- Only valid in certain situations to say that a low angle shot of a character makes them dominant and high angle reduces them to a puny, pitiful shrimp.
- The value of the shot really depends on the narrative
Viewer placement
- Viewer identifies with the camera
- Some viewpoints will emphasize depth and volume more than others (whether in a room or deeply-wooded forest)

Viewer placement
- 1 cube, 5 angles, different impressions

Camera Angles
Perspective

- Every storyboard artist and production designer has a solid grasp of perspective principles
- Frees you to imagine different viewpoints in a real location or create an imaginary one
- Linear perspective creates the illusion of space, but placing 2 shots 1 after another creates a whole new type of perspective called “sequential perspective”
- We’ll look at how to apply the “Cube perspectives” we just looked at to elements of a scene.
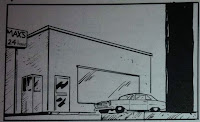
1, 2 and 3 point perspective of a convenience store >
Eye- Level View:
 |
| A |
 |
| B |
 |
| C |
High-Angle View 1
 |
| A |
 |
| B |
 |
| C |
High-Angle View 2
 A man drives up to a convenience store to find a phone.
  He goes to the door but then sees a phone booth beside the building.
 He walks to the booth and makes a call.
Low-Angle View

A man drives up to a convenience store to find a phone.
 He goes to the door but then sees a phone booth beside the building.
 He walks to the booth and makes a call
Production Design
Production Design Includes:
- Visual Character Design
- Art Direction
- Production Illustrations
- Storyboards
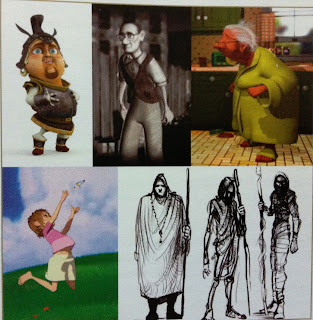
Visual elements to consider:
- Basic design elements
- Different lines and shapes convey different meaning
- Horizontals imply tranquility, vertical implies regidity, curved lines imply gentleness
- Line can convey proportion or attitude
- V-shaped head may connote a large brain, A-shaped looks more Neanderthal

- Biological and anatomical specifics
- Fur, teeth, number of legs, ear shape, tail can indicate species
- Hair length, eye colour, nose, body proportions can indicate age, gender, nationality, and some personality traits
- Interesting proportion changes (large belly, small head) will also add to character’s unique appeal.
- Colour
- Unless your cinematic is B+W, experiment with different colour schemes and combinations
- Changing a bear from brown to white implies a different setting or homeland
- Black top-hap may belong to a magician or 19th century gentleman, while a red or purple one may belong to a clown or a pimp.

- Posture, facial expressions
- Chest out, shoulders back implies confidence (or just muscle definition)
- Arched back, drooping shoulders, upturned eyebrows implies meekness
- A limp implies a past injury. Eternal grin could imply happiness (or that the character is hiding something, be careful). An extremely rigid posture might imply a missing sense of humour or a creepy disposition
- Style, grooming, condition
- Hair, moustaches, beards, sideburns, baldness, lipstick, eye shadow etc... Can all indicate age, social status and gender as well as attitude.
- Is your character unkempt or suave and sophisticated Have the events of your scene or story affected their level of grooming and style (were they just abducted or in a car crash)


- Clothing and accessories
- Type, colour, style and condition of clothing can convey personality, culture, age, gender, wealth.
- Dark colours imply sombre mysterious types (funeral, cat burglar beatnik poet)
- Bright psychedelic colours imply free spirits
- A nerd may pull his pants up high, while a "gangsta" may wear them riding low.
- Exaggeration
- Traits such as strength, confidence, malevolence and femininity can all be exaggerated to different levels
- Extreme exaggeration, though, can have the opposite of the desired effect (a vampire with 12-inch fangs is awkward rather than scary)
- Ask yourself what you want your character to convey and make sure to exaggerate the right elements to the right degree
Visual Character Design
Designing multiple characters:- Include a fair amount of variety (unless you are creating a clone army or swarm of killer robot spiders)
- Contrasting shapes and styles can keep it interesting and allow the characters’ dynamics to play off one another.
 |
| Pixar's Wall-E |
Design Progression
- May need to alter a character’s appearance over the course of your piece (black eye, change of body posture, new scar, torn shirt etc)
 |
| Pixar's Up |
Model Sheets
- Always a good idea. Include a variety of poses, facial expressions as well as head and hand close-ups
 |
Markus Erdt Portfolio |
The shorter your piece, the more you must rely on indicative (visual) deign for characterization. Longer films allow you to use behaviour to convey this
 |
| The Sliding Scale |

- SKETCH!
- Collage
- Source images and alter to create an exaggerated character
Visual style will evolve (especially as you model, texture, light and render your scene)
- Highly recommended to spend pre-production time planning the visual style.
- Collect reference images, create set drawings / paintings
- Establish a preliminary style direction that communicates:
- Time
- Place
- Mood
- Realism
 |
| Art Direction influence sheet... |


Connect Style with Story
- Make the look match the intended mood
- Wacky comedies – bright, exaggerated, cartoony characters and setting
- Hard-hitting dramas – realistic settings and characters, dull, muted colours
- Serious sci-fi or creature features often call for gritty, detailed realism.
- High-contrast, long, dark shadows and mood lighting for suspense
- Can play with these rules to be ironic or original, to create an element of surprise, but they exist for a reason
Suggest mood rather than force it
- Generally not a good idea to completely dictate the emotional response of our audience with too many obvious visual clichees
- In cartoony pieces, exaggeration is expected, but it most pieces subtlety is more effective and appropriate
Find your Visual Style
Having trouble?- Watch films
- Play games
- Look through story books, graphic novels etc
- Look at old vacation photos
- Look through magazines
- Get out in the real world and observe, sketch, find inspiration

Overall style
- How realistic?
- Highly, semi-realistic, cartoony, abstract or symbolic
 |
| Colour Palette |
Colour palette
- Warmth, heat (red, yellow, oranges)
- Coolness (blues, purples, purples, greens)
- Realism calls for subtle, earthy tones
- Gentle colour palettes imply tranquillity
- B+W perfect for drama, mystery, tragedy and nostalgia

< Monochromatic palette
Sets and Props, Vehicles
- Condition
- Living Backgrounds? (Will the set elements move, have personalities?)
- Weather + Effects – rain, fire, snow, smoke, fog, clouds, falling leaves, blowing grass and other FX can contribute to mood and setting
- Matte Paintings – strong cinematic indicator of depth, locale and mood
 |
| matte paintings add depth |
- Rendering & lighting decisions are in second part of course
- Consider how lighting quality can affect the overall mood
- Sunlight – warm, yellow directional light
- Low, blue light – cold, eerie, ominous tone
- Single bright light with strong white highlights, dark shadows – good for outer space
- All dark, with a small weak flickering light (candle) can help create sense of isolation
- Silhouette or lighting from behind can create mysterious scenes, spiritual allegories
- Multicoloured flashing lights – are we in a dance club or under a UFO?
Dimensionality
- Will your final renders be fully ray-traced with realistic lighting and shading (Up!) or will it be flay or cell shaded (South Park)
- Will you omit motion blur to simulate another style of animation (stop motion, frame-by-frame)? Will you turn off shadows to increase abstraction?
 |
| Pixar's Up |
 |
| Southpark |
Simulating Alternative Media
- It can create interest to simulate another medium
- Through appropriate lighting, texturing and rendering you could make your piece look like it was cell-shaded (Toon render), that your models are made of clay, origami paper, moving watercolours, using post-production filters
- Consider how ambitious this may be and what the technical requirements are


Simulating Alternative Media can often be render-intensive, require a lot of post-production and will require you to plan for it in your production pipeline (time to learn new rendering techniques + test, time to spend on post-production after rendering etc...)
The payoff can be beautiful
- http://www.youtube.com/watch?v=FQ7JpR4npiI
- Grain S. By Cedric Nicolas and Vincent Meyer
- http://www.youtube.com/watch?v=3SeG_9SNY2M
- L’enfant de la haute mer By Laeticia Gabrielli, Pierre Marteel, Mathieu Renoux, Max Tourret
- http://www.youtube.com/watch?v=msIjWthwWwI
- The Cathedral by Tomek Baginski
Storyboarding
Once you've developed the plot and characters and location, you must think visually about your Cinematic- How the story will flow visually?
- Think of your story boards as a preliminary comic-book cell version of your film
- Each cell describes an event in your plot (a new shot, a character’s action or a key point in the story for example)

Storyboarding

- Staging refers to how each individual story beat or action will be conveyed visually.
- An effective combination of camera angles, point of view, composition, placement of characters and objects makes for good staging.
- We will look at staging and character, camera placement more in coming weeks.
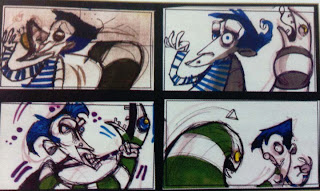
- Storyboards can be quick and rough sketches (thumbnails) or they can be carefully crafted pieces that convey visual style.
Style of drawings should match overall art direction. Goofy exaggerated characters should have similarly styles storyboards. An abstract piece does not need realistic looking characters in the storyboards.
Storyboaring is a crucial step in the production process!
- Your first opportunity to work out cinematic issues of your scene (staging, camera, composition, POV etc)
- Keep in mind these can be ironed out in layout, animatic and animation stages, but you definitely want a strong foundation for all of these now.
- Main purpose is to continue refining the visual flow
 Explore! Try things out! Have fun! Experiment! Then refine and edit
Having a visual explanation of your piece also makes it easier to “sell” and communicate with others.
Just like in 2D animation, draw fast first, then good later.
Storyboard thumbnails plot action and story
beats >
Story Beats
- Story Beat is a particular piece of action (conversation, chase, fight)
- Every beat should be represented by a scene (so the scene you are creating should focus around one beat in your story, or maybe 2 maximum if you’re feeling adventurous)
- Each scene consists or a series of shots
- A shot is the space between camera cuts (typically identified as a number appended to a scene abbreviation like WC01 or CB12)
- A single story beat may require numerous shots to tell it.
Storyboarding – how much is necessary?
- Every shot needs at LEAST 1 storyboard panel.
- Use the least number of panels per shot to visually communicate it.
- If a shot establishes a location, one panel should do – 1 shot, 1 panel
- If an action or camera move occurs, might need one panel to show beginning frame and one for the end
- Or an elongated rectangle – 1 shot, 1 or 2 panels
- A chase scene or action scene with a single extended camera tracking move may require several panels. 1 shot – many panels
Decide on the central focus of each shot
- Pay attention to the scene’s line of action, indicated by direction an object or camera is facing or travelling (will look at this more in coming weeks)
- Apply traditional image composition principles – rule of thirds, symetry, balance, lines – can use silhouettes to evaluate your composition
- Source images and alter to create an exaggerated character
 |
| Silhouetting is important! |
- When you start your storyboard, begin with broad strokes and work on the overall structure before focusing on individual elements and shots.
- See if you can fit your entire scene onto a single sheet of paper with loose rough thumbnails
- Consider each action in your script, then close your eyes and think of the most visually appealing and interesting way of showing this.
- Whose POV? One long shot or several? Can POV change? Can we see multiple character expressions or just 1?...
- Start with simple stick figures, work fast and loose
- One you have explored many options, use the “why” technique to justify / edit your decisions
- Do this for each story point, make sure it’s existence is absolutely necessary!
- Once you can see the flow and it makes sense, then focus on the individual actions with an eye for cinematic staging...
Ask yourself the following questions:
- What is the action being presented?
- From what POV?
- What happened before, what will happen next?
- What is the intended style and mood?
Tips
- Use the aspect ratio you intend to use in your final at the storyboarding stage to keep frame size in mind:
- 1.33, 1.85 and 2.35 are some TV and film standards (33% wider than tall, 85% wider than tall etc...)
- You will most likely be doing 1080 or 720 HD, so keep 16:9 in mind)
- Storyboard panels don’t have to be in exact ratios, but should be approximate
3 components of each panel
- Character, object, background imagery
- Movement indicators (frames and arrows)
- Text
If you prefer not to draw you can use 3D dioramas and photograph them...or use live actors


Basic camera moves
Write these into your script and storyboards!
- Cut – Instant transition to another POV
- Pan – Camera rotates to the left or right from a fixed spot
- Tilt – Camera rotates up or down from a fixed spot
- Track – Camera moves sideways or up/down
- Dolly – Camera moves away or towards the action
- Zoom – Camera stays in place, but focal lens changes so image gets larger or smaller.
 Arrows can indicate object / character movement
Secondary frames and arrows can indicate camera movements

Text
- Words can be used to indicate dialogue, narration and as descriptive notes, such as camera velocity, sound effects etc...
Floor plans + movement
- Sometimes the best way to illustrate character + camera movement is to combine POV frames with a floorplan view of a camera + character moving through a scene.

Critique
- Lay out all your boards and think of your scene on the whole. Is there too much of one element? Is another element lost? Did you forget anything? Overdo anything?
- Are there too many OTS shots?
- Do any shot sequences break the line of action? (will examine this in the coming weeks)
- Can you fix it?
- Unnecessarily establishing the same locale more than once?
- Any shots that do not hook up appropriately?
- Continuity: is a car traveling left in one shot, then right in another when the direction should be implies as the same?
- Does the camera jump back and forth between wide and close shots too much? ...
Wrapping up
- Review your storyboard with your group and with others.
- Walk viewers through your scene and elicit feedback, critique - note that if it requires too much explanation it isn't working!
- If anyone is unclear at a certain point, consider reviewing that board.
- Remember, if you’re going to have to make significant modifications to your cinematic vision, sooner is always better (and cheaper) than later.
- Take a look at some storyboards of scenes that inspire you and compare them with the finished piece to get a better understanding of the process!


Taking it further
- Animated storyboards – flash, after effects (not required)
- Video storyboards
- Very rough animatics (we'll be making animatics in several passes with our primitive assets (set and characters) to explore the camera animation