Pages

Saturday, December 8, 2012

DESN3020 Cinematics End Of Term

Hey Class, its the END OF TERM!!!!

As a reminder to those of you in the Cinematic class, as of DECEMBER 11, 2012, all work is DUE. 

 All work must be handed in IN CLASS or emailed to me via: cferadaymiller@georgebrown.ca
When  sending a link to your work, you MUST include the link to the file location (not the top tree of the dropbox), and the file name. I'm NOT going to dig for your work.  If the file indicated is not on the page linked to, I will see this as a missed submission. 

Due last class:  final 3D animatic and summary of all the beautiful work you've done thus far. Package it up nicely. A happy Cathy is a kind Cathy. Images and avi only, no obj files, no psd files, etc.  Links to Vimeo or Youtube work beautifully. 

As discussed in class, the grades have been broken down in the following way:


A number of students in this class have not submitted work for some of the milestones. Without an actual submission, the mark for that milestone will be graded incomplete (fail). 

I've seen most of  your work in class, and many of you who are missing milestones have actually done the work... so hand it in!

This semester has been more about getting the work done than industry quality.  Next semester will be about getting it to look GOOD.  Working fast first and adding iterative polish is a critical component to a production environment. 

A reminder: no textures, no lighting, no animation this semester (other than camera animation). All the details and finesse that will make your work great and make you stand out will be refined in semester 2, where you will be graded to Industry competency. 

Good luck, hand in  your work, and have a well-deserved Holiday Break! 

~Cathy

Sunday, October 28, 2012

DESN3020 Cinematics Class 08/Week 09


Putting It All Together: The Animatic

Scheduling 

Make a schedule for entire team that:
  • covers in complete detail up to end of this term (December)
  • covers in increasing detail up to end of project (April)
 
Use this type of chart to create more detailed assignments for each group member.

What the rest of this semester should look like: 


These four final milestones are worth up to 85% of the final grade for some people, so staying on track really counts. 

The final 3D animatic (this semester) will be: 
  • untextured low-poly or proxy models
  • basic lighting (if any)
  • most likely scratch audio
  • fairly sophisticated camera animation
  • characters will be in, at most, a few poses per scene 


3D animatic is about blocking and timing, not detail or finesse.

Next semester is the time to spend time on lavish, gorgeous detail, in the modelling, fx, lighting and animation aspects of this assignment.

A note on character creation: 

May not co-inside with Character Modelling class


Concept of Character

Proxy and final meshes share this proportion exactly.

Proxy Character mesh

Proxy Character - all proportions correct.

Character creation can be an iterative process if these rules are followed:
  • final mesh is exactly the same size as base mesh
  • all meshes must fit exactly onto same rig
    • reference character mesh
    • create rig
    • update reference when new versions of mesh are created
  • non-destructed work flow

If no rig is available and a found rig is used, it is unlikely that any animation or poses can be seamlessly be re-used unless  new rig is created with exact same hierarchy and joint/controller names as 'proxy' rig. 

Proxy mesh posed (with rig).

Due NOVEMBER 5/6:

Animation side: 
  • storyboard animatic revisions
  • scratch audio or raw wav files
  • evidence that the 3D layout is or can be started
Modelling side: 
  • scratch audio or raw wav files
  • first pass meshes: 
    • all key elements in cinematic created as proxy or low poly
      • characters
      • environments
      • props
  • evidence of hand-off to animators 
Rough Models
 
Characters:
  • Low-Poly Character models should match up with a model sheet
  • Front and Side views of T-pose with reference art as image plane to show proportions match.
  • For this milestone, submit JPG screen caps of models in various views or avi of rotation.
  • Sufficient breaks in geometry to allow rig to be parented and animated properly
Props:
  • All major prop models created (low-poly)
  • 1-2 ortho views to show match with concept art
Sets:
  • various perspective views to show overall layout  


Sunday, October 14, 2012

DESN3020 Cinematics Storyboards DUE

Storyboards DUE TUESDAY OCTOBER 16, 10 PM. 

Completed Storyboard 

Storyboard submission details: 
  • Email link or file to: cferadaymiller@georgebrown.ca (this address ONLY)
  • PDF file format
    • no single frame jpg files in a folder
    • no png files
    • look professional people!
Please be as concise as possible. This is not a drawing class, but marks will be awarded on clarity and composition:
  • WHO DID THE WORK???????? Students must always indicate the author and group/project name on EACH PIECE handed in. Otherwise, how can I mark you?
  • Indicate camera and character placement and movement as well as transitions 
  • This must illustrate your intention for what you will create in detail for your complete scene for your finished cinematic.
  • Shots should be numbered logically (Shot 1 may have frames 1a, 1b and 1c while shot 2 may only have frame 2a and 2b, and shot 3 is only one panel). 
  • include any notes you feel necessary
  • include any dialogue or VO lines
This is PART ONE of a 3-part storyboard submission process. 
  • storyboard drawings as pdf file
  • storyboard.avi (adding the element of time to the storyboard)
  • storyboard.avi with sound/scratch sound added
Your group will receive the final Storyboard grade after this third storyboard instalment is handed in. 

Stick Figure storyboard: This is the minimum....be more descriptive visually of angle and scene elements.
This is not a drawing class, but be concise and clear. You can do better than this! Note shot numbers are indicated even at this rough state.

Fantastic Mr. Fox storyboards: Great drawing, but you will need to indicate shot numbers and camera instructions/ notations on each panel. 

Fantastic Mr Fox: Great descriptive boards, beautiful drawing, but no camera indications and no shot numbers on panels. NO NO NO! 
Pretty good: Still no camera notations, but shows action, acting, camera angles and shot sizes.
Pretty good boards, lacking camera notations.
Batman Begins storyboards: include shot number, camera instructions, shot size, angle and strong drawing! 

Batman Begins boards: can you do this? 

Previous Assignment: Script and Pre-Production Package: Due Oct 10

Marks will be in next week. In general, most of the groups did not label author of each document.  Many groups did not share the work evenly amongst the group, and some groups had documents coming in later or in different packages ("add this to group X"). 
Groups that failed miserably with the technical aspects of being group and submitting as a group can re-submit a cleaned up Pre-Production Package for extra grades. 
We will discuss in class.  

DESN3020 Cinematics Class 07


Staging and Camera

Staging: The Process

Basically a director is dealing with 3 factors when composing a scene for the camera (physically or digitally):
  1. Narrative considerations
  2. Dramatic Considerations
  3. Pictorial Considerations
Narrative considerations
Specific actions described in the script.
  • “Man pulls into a gas station and gets out of his car to fill his tank”
  • In this case the action is straightforward, little room for staging interpretation.
  • If a scene takes place at a party though, the characters are free to move around a house, the camera and the actors are free to move anywhere.
Dramatic considerations
These include the elements which colour our emotional understanding of a scene.
The fall into 2 categories:
  • Point of view
  • Dramatic Emphasis
Point of View
  • Manipulation of POV in a scene is single most significant decision in determining camera placement.
  • Fluid point of view (changing during course of the course of the piece) is common in narrative film.
  • POV can change rapidly from one character to another in a scene – favouring one or the other
  • Or POV can maintain a more neutral stance.
  • We have scene how the director manipulates narrative logic, eye contact and shot size to control POV
  • Narrative logic is more overt (if we follow a certain character at the beginning of a scene before new characters are introduced, we’re more likely to see the scene from the first character’s POV)
  • Eye Contact is a more subtle way of controling POV, but still very potent.
  • Shot size also controls our identification with a character.
  • Tighter shots = higher intimacy
Dramatic Emphasis
  • Related to shot size
  • Can heighten or diminish an actor’s performance, physical action and dramatic events
  • Any actor can be made to control our attention merely by where they are placed in the frame.
  • Lighting, art direction, editing etc. all help control dramatic emphasis
  • But for staging, concern is shot size and subject placement in frame.
Pictorial considerations
  • Graphic elements such as composition, framing, lighting and photographic properties of the lens.
  • Pictorial qualities are easiest to visualize – less dependent on other shots in a sequence for full effect
  • When you set out to create your final renders, you should have visualized all the pictorial qualities that will appear on screen already
  • The way in which you, as a director, choose to emphasize the 3 factors (narrative and pictorial considerations and dramatic emphasis) define your staging method!

The Dramatic Circle of Action

Narrative can be impacted, cinematically, by placing the camera inside or outside of the action.
This concept is referred to as the Dramatic Circle of Action.
  • This is the space in which the action takes place.
  • The camera can either be placed inside or outside of this circle
  • An edited sequence can combine shots photographed from either placement.
  • A moving camera can go inside the circle and out again or vice versa. 

Mobile Staging

“Either the camera will dance or I will” – Fred Astaire
  • When choreographing a scene there are 2 basic methods of staging mobile action 
    • move the camera or move the subject
  • Over the past few weeks we’ve looked at how to use several different camera viewpoints to direct the viewer’s attention
  • The camera moved around around characters who were in a fixed position
  • We can also direct the viewer’s attention from one subject to another by having the subjects move within the space framed by the camera
  • We will generally use a mixture of both methods to keep our scenes visually interesting.
  • We can also move the camera in a tracking or crane shot.
Below we see a standard Shot, Reverse Shot using OTS framing.
  • But by having the man turn around in shot 4, we no longer need to cut to a new shot to show his reaction:

Mobile Staging: Standard Shot, Reverse Shot, OTS Framing
 Here we see an alternative staging method, substituting the actors’ movement for editing:


Mobile Staging: actors move rather than camera cut
These 2 examples of mobile staging give us the basic idea.
  • The only criterion that an actor’s movement has to meet is whether it is motivated or not.
  • You should never have to invent artificial “stage business” just to add action to the scene.
  • If the story and directing process are working together, ideas will emerge – ask yourself about natural human behaviour when animating characters in a scene.
Putting it together
  • We've already looked at examples of building a scene from key events in the action with more static characters.
  • Working out choreography for characters is merely a matter of connecting different patterns and positions so that all the separate views of a scene are linked into a single shot.
First we’ll look at a simple 2-position sequence using camera movement and a character who is repositioned in the shot

This represents a single, unbroken shot
 Now we’re ready to look at a considerably more ambitious sequence (sorry about the image compression).


panels 1 & 2: cam position A & B

panels 3 & 4: cam position C & D

panels 5 & 6: cam position E & F

panels 7, 8 & 9: cam position G & H
panels 10 & 11: cam position I
In this past example of mobile staging in a sequence shot, we saw several different techniques to get the maximum use of a 15 foot line of motion (for our camera)

Techniques such as:
  • Staging in depth
  • Panning from a stationary position
  • Retracking over the same space – reversing camera direction
  • Following one subject (the boy) and then the other (the girl)
  • Pushing in towards a subject then backing away…
were used to make the most of the space and tell the story in a dynamic, fluid way

Action and Reaction

  • Only 2 types of shots in a conversation – the action and the reaction.
  • Filmmakers often overly concerned with the action
  • But we can learn as much from the reaction as we do from the action.
  • This can help “loosen up” your staging, as the person speaking need not be the centre of attention.
Below we see an example of “loosened up” staging where the man in the background circles our main actor
  • Most of the background character’s action is off-screen.
  • The camera pushes in to a CU of the foreground character so we can see his reaction to a long speech by the background man.
Staging: focus on the reaction. 

Moving the Centre of Interest

The character who is centre of interest can move around other characters so that the main subject directs us to the reactions of other characters

  • Think of the Drill Sergeant walking around a group of recruits.
  • Lots of opportunities to include actions and reactions simultaneously in a variety of compositions

Indirection

Not every point in a story or dialogue needs to be emphasized

  • Holding back the expressive power of film sometimes is a way of emphasizing all the other moments
  • Sometimes this may mean staging some action in the BG even if it’s central to the narrative
  • The idea that an important line of dialogue is also not necessarily true.
  • So you as the director are freed from composing every dramatic point full screen in CU!

The Moving Camera

The Pan

  • The panoramic shot is where the camera rotates on it’s vertical axis as much as 360 degrees
  • Camera rotates in one position, does not move positions
  • Pans don’t offer the dramatic shift in perspective that tracking, crane and hand-held shots do
  • But, can cover space faster
  • A pan can easily frame a goal post in one frame and move to the opposite goal post in a second.
  • We can pan to:
    • Follow action
    • Include more space than can be viewed in a fixed frame
    • Connect 2 or more points of interest graphically
    • Connect / imply a logical connection between 2 or more subjects


 Here we see an example of using the pan to lead our attention – in this case to the couple at the table
Pan focusses the eye on couple at table (eye line)
Here we see an example of using a cross-pan to redirect the movement of the camera from one actor’s direction of motion to another (camera starts one way and reverses to the opposite direction).
  • The effect: We skip attention from the couple to the runner (again, sorry for the compressed image)


cross-pan
 Here we see an example of using a pan that leads our attention from far to near.

  • The camera pans with the runner as he turns a corner and moves left to right until he goes behind the woman seated in the car in the extreme foreground.


Pan with BG character then shift focus to FG character

The Crane

Inherently majestic, hold our attention regardless of the subject because of the dynamic movement.
  • We will see some examples of applications for the crane (illustrated using real-world camera crane) – which we can emulate in CG
  • Simultaneous vertical and horizontal movement


Crane follows subject through rugged terrain.

The Crane: Inquisitive Observer

The Crane: Reinforcing point of view

Tracking (Dolly)

  • Tracking shots are used to to follow a subject or explore space.
  • Can be a simple shot framing 1 subject, or a complex sequence connecting multiple story points in a single fluid movement.
  • The moving camera follows some of the same rules as a static camera – it is either inside of or outside of the circle of action
  • Tracking can get dramatic angle changes
We can:
  • Track to introduce a subject or location
    • Ex: Camera moves down a sidewalk on a deserted street. Not restricted to a straight line though.
  • Track at the same speed as a subject
    • Follow 2 or more people in conversation – equivalent to a static shot
  • Track faster or slower than a subject
    • Subject will approach the camera as it moves, or be left behind when the camera moves faster.
    • Let’s the subject enter or exit the circle of action
  • Move towards or away from the action
    • Can be used to emphasize a character’s moment of realisation
  • Track around a subject
    • Camera can surround the dramatic circle with subjects at the centre
  • Enter or exit an interior
    • Helps us move from location to location fluidly


Tracking/Dolly

Tracking/Dolly


Tracking doesn't have to be in a straight line.

Track/Dolly to focus on a subject.

Track/Dolly exterior/interior

Transitions

Standard transitions include:
  • The cut – the “present tense edit” – although nowadays used in a much broader range
  • The dissolve – indicates a passage of time, forms a bridge
    • Includes the Focus in/out where one shot focuses out into a new shot that focuses in.
  • The wipe – Rarely seen today unless we’re going for a retro vibe
  • Fades – effect of setting “episodes” or separate scenes apart from one another, like chapter headings. Fades separate scenes while cuts or dissolves join them.
  • The white-in / white – out
    • Or colourful variations of this. Particularly ethereal quality.
  • And of course the “Freeze-frame” and “montage”


DESN3020 Cinematics Course Overview

This semester's overview at a glance:


Grading

As this is a production course, and not specifically an asset-creation course, it is important to be organized and scheduled. 

For those who work on a team, this is critical.  It is not acceptable to hand in assignments late or with missing pieces. It is the responsibility of the entire team to ensure that team members are being fully utilized.

For those working on a solo effort, production planning is critical to establish path, track progress and alert the student to possible disasters (running out of time, assets unfinished, technology issues). 

The 5 assignments to b handed in this semester are: 

  1. script/production package
  2. storyboard in 3 stages: drawn, avi and avi with sound. 
  3. rough models
  4. audio
  5. animatic
The total % of grade for these materials/assignments is 90%.

Production 10%

10% of semester 1's grade will be based on TEAM WORK
Each group starts off with 100% or 10/10 in the Production Category for all 5 assignments that are due this semester. 
For every production error or issue per assignment due, up to 2 marks (or 2% of final grade) will be deducted from the entire group. 
Each of the 5 assignments due can cost you or keep you 2% of your final grade. 

Scenario:
  • Group Bazinga has 3 modellers and 2 animators.  The modellers wanted to do everything and only assigned (or ensured that) one of the animators had anything to do. One of the team members had nothing at all to do, and in fact, was discouraged from presenting anything (production grade docked 1 point). 
  • To make it worse, one of the modellers forgot to hand in their assignment with the Package, and handed it in the next day (production grade docked 1 point). 
Result: 
  • Entire team looses 2 marks, or gets 0 in the production category. 
  • Animator that handed in nothing gets 0/5
  • Modeller who handed assignment in late gets docked one full grade (as per George Brown's grading policy).

Utilize Everyone In Your Group

During production, it is common for some people to be busier than others at different times. Please be sure to utilize your team mates to the best of their abilities.  

With the groups made up of VERY different combinations of modellers/animators, it is hard to create a grading rubric. 

For those with a solo effort, the grading will go like this: 

Group Members: 1
Deliverables:
  • Script & Production Package:  10%
  • Storyboard (2D, avi, and with scratch audio):  10%
  • Rough Models:  25 - 35%
  • Audio: 10%
  • Animatic: 25 - 35%
  • Production: 10%
The Grading Method for more complex groups will have to be determined on an individual basis, adhering as closely as possible to the above standard. 
  • If some of the group members have only one large task to do, we can break this task down into smaller milestones so as to keep on track and eliminate possible disaster on the final due date. 
Scenario: 
  • Group Bazinga has 5 people: 3 modellers and 2 animators. Thus far, the modellers have done all of the Production Package & Script work, and will do all of the modelling. They plan to use 3DS Max's rigged character for the 3D animatic, as they are rigging next semester. Thus far, the animators have nothing to do this semester. 
  • Group Bazinga MUST have the animators create the storyboard and film/edit it with sound. The animators MUST create the camera animation for the 3D animatic and they MUST do the 3D layout or shot assemblage to create the animatic. 


Monday, October 8, 2012

DESN3020 Cinematics Class 06: part TWO

Editing: Temporal Connections 
Staging Dialogue

Welcome the DESN3020 Cinematics course material (courtesy of George Brown College). The subjects of this posting is editing to create temporal connections and staging dialogue.

Editing:  Temporal Connections

Film History moment:
  • 1920 - Lev Kuleshov performs a now famous experiment that demonstrates that the meaning of shots in sequence can be created entirely through editing.
  • Here we see a close-up of a male actor’s expressionless face as a reaction shot in 3 different sequences.
  • We see the actor “reacting” to:
    • a bowl of soup
    • A child in a coffin
    • A woman lying on a sofa
  • Audiences marvelled at the actor’s sensitive performance in every instance, even though it was the same close-up shot being used!
You can see the Kuleshov footage with an overview here:
Basically, viewers tend to bring their own emotional reactions to a sequence and then attribute those reactions to the actor on screen.

While the editing process can have a powerful impact, in most narrative films shots are rarely neutral building blocks pieced together as Kuleshov used them.

Shots have been composed to tell a story and convey a feeling according to the script.

Each shot, together with soundtrack, contains narrative and graphic info that predetermines key editing decisions – like length and order of shots
  • This view of editing emphasizes director’s and writer’s role in shaping storytelling logic that gives the editor a basis to work from.
  • Storytelling logic refers to structure of shots, sequences and scenes.
  • Structure controls the order in which info is given to the viewer. 

The order in which info is given to the audience is as important as the information itself!

Since structure in cinematography can be conveyed in a storyboard in ways that a script just cannot, the visualization process can be considered part of the writing and in the end the editing process as well!

The Narrative Impulse – from E.M. Foster’s definition of a plot

  • If we state that “The King died and then the Queen died” we don’t have a plot
  • If we say “The King died and the Queen died of grief” we have described a plot because there is a causal connection.
  • In any story, this cause and effect relationship is the underlying scheme that involves the reader/viewer.
  • It achieves this by asking the reader/viewer to make the logical connections between events.
  • Foster’s example above is simplified to make a point, doesn't show us how the author could reveal the relationship between King and Queen.

In fiction, cause and effect often set up as question and answer scheme
  • Encourages our participation
  • Cliff-hanger ending in serialized stories (instalments in a larger story) where answers are withheld to create suspense is an example of most exaggerated way of exploiting this device
  • Questions may be answered through the accumulation of much information over time while others can be answered shortly and quickly after being asked 

Continuity editing is based on these kinds of question and answer schemes, usually called connections.

Following are 3 most basic types of connections found in continuity editing:
  1. Temporal connections – cut from a man dropping his drinking glass in one shot to the glass breaking on the floor in the next shot.
  2. Spatial connections – cut from a wide shot of the White House to a recognizable detail of the White House in a closer shot (like the front door)
  3. Logical connections – we cut from a wide shot of the White House to a shot of the President seated in his office. We don’t need a temporal or spatial connection if we recognize that the President would be seated inside the White House (for example). 

We can think of these as background connections that establish environment, but we can also use them to shape the plot and dramatic content as well! 

Narrative Motion

  • Nearly all editing strategies in narrative film are devised to set up a framework of expectations in a series of shots. The result is narrative motion.
  • This way of arranging shots is fundamental in film editing.

Q&A Patterns

  • Simplest Q&A editing pattern requires only 2 shots:
    • Shot of actor looking offscreen
    • Shot of thing actor was looking at
  • Patterns not limited by length, may take dozens of shots to complete a Q&A cycle.
  • Some of the best Directors are admired for the way they develop these patterns that challenge the viewer 

Conext

  • Meaning of any given Q&A pattern can be further extended / modified by changing the context that frames it.
  • In the example we started with, our understanding of the man’s reaction to the bowl of soup, coffin, and lady is framed by our assumption that the man is sincerely moved in each scene.
  • If a new scene were added that lets us know he is faking his reactions, then we will interpret the whole sequence differently 

Using the patterns

  • Interesting compositional ideas are usually the result of inventive narrative techniques rather than boundary-pushing visual techniques.
  • The next few examples show how narrative context and Q&A pattern determine how we “read” a scene... 

Example 1:
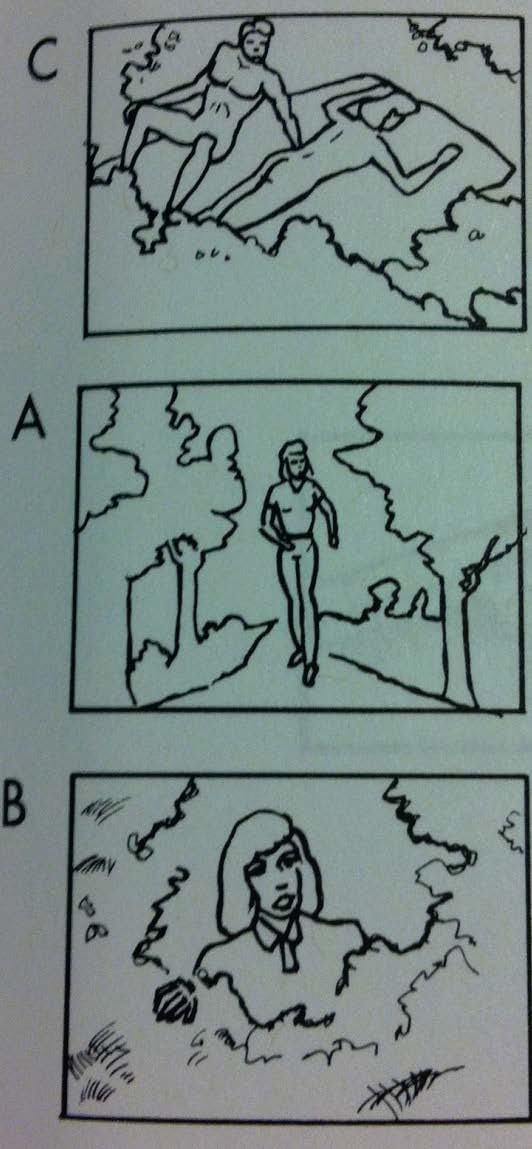
Our scene takes place in the woods on a summer day. Laura is looking for Tom. We have not yet seen Tom, so we don’t know what he looks like.
  • Shot A: Laura enters the woods (Q: Where is Tom?)
  • Shot B: Laura stops short a few yards from a clearing (Q: What has she found?)
  • Shot C: Tom and a girl are lying naked on a blanket in the clearing (A: Laura has found Tom...BUSTED!)

Example 1

Example 2:

  • Shot A: Laura enters the woods (Q: Where is Tom?)
  • Shot C: Tom and a girl are lying naked on a blanket in the clearing (Q: Will Laura find Tom?)
  • Shot B: Laura stops short a few yards from a clearing (A: Laura has found Tom!)

Here, if we prolong the time before Laura arrives, the viewer would share a secret with the film-maker – we know Tom is nearby in a compromising position.

  • Placing an answer before a question creates suspense 


Example 2
Example 3: 
Change the narrative context again!

  • Shot C: Tom and a girl are lying naked on a blanket in the clearing (A: Tom is Here)
  • Shot A: A girl enters the woods (Q: Is this Laura?)
  • Shot B: Laura stops short a few yards from a clearing (A: This is Laura!)

By having the compromising position in the opening shot, we've established a suspenseful situation.

  • Editing patterns and the narrative context do not necessarily lay the events of a story out in simple chronological order 


Example 3 

The Limits of Clarity

Because Q+A storytelling techniques frequently relate info in a roundabout way, this indirectness may be confusing to others in a screenplay, shot list or storyboard.

Avoid unusual Q+A patterns because it will be difficult for an audience to follow.

If an establishing shot merely shows us what we already know and does little to raise our expectations or contribute to narrative motion then it could in the end be less effective than a more challenging sequence of establishing shots

Camera Cutting vs Coverage

A fully-developed storyboard can show a director all the shots needed for a scene.
In CG productions, we “Cut in the Camera” as some film directors also do.This means that the camera (shot size and angle) is specified in the storyboard. 
This cuts down the amount of footage needed as the director only shoots the action from the specified camera.
Often in film, directors shoot to get “Good Coverage” of the action, but this results in a lengthy editing process – and lots of footage.  This is too expensive to do in CG.  

CG production (films, tv, cutscenes) tries not to create more footage than is specified in the storyboards. It is too expensive (artists time, rendering time).
  • Smart planning and pre-visualization means less work in the long run!

Cutting On Movement

Let’s say we have a boy jumping over a hedge and we want to decide where to insert a new shot of the action. 
3 options:
  1. Cut to a new shot at the point where the boy reaches the hedge, begins to jump
  2. While the boy is jumping
  3. After the boy lands 
Cutting on a movement.
These are all 3 acceptable edit points, but in Continuity style, convention would be to cut before of after the boy has left the ground.
  • Tends to hide the cut, making the transition to the new shot invisible!
  • Exact point of the cut is dependent on subject’s and editor’s sense of movement.
  • Cutting on action is found in almost all types of sequences – if the subject is lifting a drink, or merely moving his or her eyes, or running from a huge rolling ball in the Temple of Doom.
  • Mindful filmmakers will stage action so that it will overlap an edit point - in animation, the action should repeat
    • last 6 frames of the outgoing (first) shot should have the SAME action as the first 6 frames of the incoming (second) cut (overlapping action)

Exits and Entrances

When the subject of a shot moves into or out of the frame, common practice is to make the cut while the subject is still partially within the frame.
  • The effect on screen is to make the cut smoother and speed up the flow of action.
  • Here we see the position of a subject in an outgoing and incoming shot.

Exit and Entrances

Clearing the Frame

Alternative to cutting on movement to join different angles of the same object
  • Subject is allowed to exit the frame before the cut to the next shot.
  • Customary to hold on an empty frame of the outgoing shot for a moment
  • Can still have other action the frame while this “hold” is happening
Clearing the frame
Can look at this in 2 ways

  1. A method of joining shots of the same subject in different backgrounds – Similar to dissolve, it indicated the passage of time.
  2. A substitute for the cut on action so that the incoming and outgoing shot represent continuous time.

Useful if you are afraid of making a continuity error – almost impossible to do so with this technique, it can even be used to join shots on opposite sides of the Line of Action!

Clearing the frame


One last strategy:

  • The outgoing shot ends with the subject clearly in the frame.
  • The incoming shot begins before the subject appears and holds on a clear frame for at least a second before the subject enters
  • note: film  moves at 24 frames per second. Illustrations below are not frame accurate


Outgoing/Incoming

Editing and Visualization


  • The value of knowing conventional editing techniques – gives you a good starting point when visualizing (storyboards etc)
  • Staging is made easier by being aware of the types of movement that provide a good opportunity for cutting shots.
  • In any scene, you will visualize how long certain action should be viewed before moving on to another shot.
    • Don’t think of these rules as overly restrictive. They can be broken.
    • The value is being able to visualize the camera setup for an entire sequence, allowing focus on the dramatic needs of the scene! 


Staging Dialogue

The goal: honest expression of human relationships and presentation of these relationships to viewers.
The challenge: the ability to predict in 3D space what will look good on a 2D screen.

The spatial approach is made up of 5 basic areas of focus:

  1. Staging stationary actors
  2. Staging moving actors
  3. Using the depth of the frame
  4. Staging camera movement
  5. Staging camera movement and actor movement together 

Some basic conventions to be aware of:

  • Frontality – Subject of a picture tends to face the viewed head on. “Cheating out” actors tend to face the camera more than each other directly.
  • The Master Shot – one shot that is wide enough to include all actors, sometimes part of a series of shots, sometimes the only one necessary
  • The Sequence Shot – When the master shot is a moving shot and moves fluidly with a Dolly throughout the course of the scene.
  • Shot Size and Distance – Medium 2-shot is the tried and tested way of covering 2-person dialogue (perhaps even over-used) and allow body language to be shown.
  • The Shot, Reverse Shot pattern – When actors are seen in alternaing close-ups (remember continuity!). 
Some basic conventions to be aware of:

  • Sight Lines and Eye Contact – The closer the sight line is to the camera, the more intimate our contact with the actor. Direct eye contact with the camera though can be quite startling
  • Once you’re familiar with the psychological and dramatic implications of sight lines and eye contact, you can make subtle shifts for dramatic emphasis in a scene.


Sight Line and Eye Contact

Staging with “Letter Patterns”


  • The system we’ll be looking at uses 2 categories to describe actor placement:
  • Pattern: 3 basic letter patterns: “A”, “I” and “L”. These are the letters that grouped actors resemble from above.
  • Position: the direction the actors are facing within a pattern. Can be many positions for any given pattern.


A, I and L Patterns
The “I” pattern for 2 players is the basic building block of this system.

  • The “I” pattern is even found within the “A” and “L” patterns when we are isolating 2 characters in a shot out of a larger group or staging formation 


Dialogue Patterns

Position 1:  Face to Face

  • Most basic conversational positioning.
  • Allows for powerful subject oppositions.
  • Don’t see much facial expression unless the framing is very tight 


Face to face.
Position 1 – OTS

  • Used for shot, reverse shot pattern.
  • Can isolate the speaker by framing tightly, blocking off 1/3 – 1/2 of the back of the other character’s head.
  • May be a logical follow up to shots we saw previously
  • Can experiment with low angles as well to make “Over the Hip” shots 


OTS
Position 1 – Low Angle Reverse Shot

  • “Over The Hip Shot”
  • Dynamic, put characters in adversarial positions.


"Over the Hip Shot"

Position 2 – Shoulder to Shoulder
  • Frontal positioning offers more options since we see front or profile of both actors in same shot.

Shoulder to shoulder


Position 3 – 90 Degree Angle

  • Compromise between Shoulder To Shoulder and the Parallel arrangement of Position 1
  • Can put one player in profile while allowing the other to be frontal 


Other positions

  • There are many other positions to experiment with.
  • The following are all examples that create tension.


Staging Dialogue for 3 subjects

Difference between “A” and “L” Patterns
  • Not always easy to determine which applies since characters will not always be in precise patterns.
  • General rule: if 2 characters are facing the other player and the 2 characters frame the other, then this is an “A” pattern.
  • If the 3rd characters is lined up outside the other 2 characters, this in an “L” pattern.
  • This aspect of staging is called “Opposition”
  • We’ll look at some examples of it next... 


Difference between “A” and “L” Patterns


Examples of “A” Patterns

Examples of “A” Patterns

Examples of “L” Patterns

Examples of “L” Patterns

Examples of “L” Patterns

Examples of “I” Patterns

Examples of In-Depth Staging

  • Still uses an A-pattern here, line of action established between man and 2 women.
  • Can still choose shots that respect the 180 rule to explore what’s going on between these characters 
In-Depth Staging
  • Obviously there are many more positions for characters and cameras to experiment with, and all could lend some meaning or imply something about your scene if you set it up thoughtfully.
  • Feel free to experiment with what will work best for you and don’t be afraid to push the boundaries! 


Staging Dialogue for 4 or more subjects

  • Still use the same A, I and L patterns
  • However, as the number of characters grow, so do the options for how to frame group or individual shots within this larger set of characters.

By the numbers:
  • In a scene with 5 characters there are:
    • 5 possible CU
    • 9 possible 2-shots
    • 6 possible 3-shots
    • 1 possible master shot
    • (or 27 different shots possible) 

Here we see the line of action established between 2 principal characters in a group.

Here we see what happens if 3 key characters share dialogue equally
  • The A pattern applies and we can position the camera accordingly
  • Even the A pattern, as we now know, is reduced to blocks of I patterns when determining the line of action

A Pattern

Here we see what happens if 4 key characters engage in the scene.
  • Multiple lines of sight = multiple lines of action.
  • Limit yourself to a few key setups.


Multiple Lines of Sight

While it’s easy to visualize this from an aerial view (as we just have) it can be more difficult to do so from a shot framing perspective.

Some examples follow


A Pattern

L Pattern

In-Depth Frontal Positions

Crowds and Large Groups

2 basic approaches:
  • Camera is either in the crowd looking out or outside the crowd looking in.
  • Shots taken within the action are usually taken from a wide or normal lens
  • Shots taken from outside the action are usually taken with a telephoto (zoom) lens.
  • In CG, we simulate different lens types and focal lengths, so it’s important to understand how these affect a scene.

Comparison: Normal Lens within the action vs Zoom lens outside the action 


Normal Lens

Zoom Lens